들어가며
MapStruct는 Java 애플리케이션에서 객체 간의 매핑을 자동으로 생성하기 위한 코드 생성기다.
이번 글에서는 프로젝트에서 MapStruct 를 사용한 부분을 리팩토링한 몇 가지 예시를 통해 MapStruct 를 조금 더 효율적으로 쓰기 위해 알아야 할 부분들을 정리했다.
기본 사용법에 대한 내용은 편리한 객체 간 매핑을 위한 MapStruct 적용기 (feat. SENS) 에 잘 설명되어 있으니 참고하면 좋을 것 같다.
default 메소드는 필요시에만 사용한다
아래처럼 source 와 target 이 존재하고 이를 매핑해야 하는 경우
// source
@Builder
public record QueryMemberJoinTeam(
        TeamMemberRole role,
        Long teamId,
        String teamName
) {
}

// target
@Builder
public record ParticipantInfo(
      @Schema(description = "팀 이름", example = "team1")
      String teamName,
      @Schema(description = "팀 ID", example = "1")
      Long teamId,
      @Schema(description = "팀에서 역할", example = "관리자")
      String role
) {
}
default 메소드를 사용하지 않고 @Mapping 만 이용하면 된다.
// Before
default ParticipantInfo toParticipantInfo(QueryMemberJoinTeam queryMemberJoinTeam) {
    return ParticipantInfo.builder()
            .teamName(queryMemberJoinTeam.teamName())
            .teamId(queryMemberJoinTeam.teamId())
            .role(queryMemberJoinTeam.role()
                    .getDescription())
            .build();
}

// After
@Mapping(source = "role.description", target = "role")
ParticipantInfo toParticipantInfo(QueryMemberJoinTeam queryMemberJoinTeam);
수동으로 특정 값을 지정할 때 constant 또는 expression = java() 를 이용할 수 있다
아래처럼 Order 에 매핑해야 하는데 view 값과 orderStatus 가 source 에서 주어지지 않았다고 가정하자. 이럴때 constant 와 java() 를 이용할 수 있다.
@Mapping(target = "view", constant = "0")
@Mapping(source = "member", target = "member")
@Mapping(source = "team", target = "team")
@Mapping(source = "product", target = "product")
@Mapping(target = "orderStatus", expression = "java(OrderStatus.PENDING_CONFIRM)")
Order toOrder(MakeOrderRequest request, Member member, Team team, Product product);
constant 를 이용하면 상수값을 지정할 수 있고, expression = java() 를 이용하면 java 코드를 실행시킬 수 있다.
이때 imports 로 사용할 클래스를 추가해야 한다. 추가하지 않는다면 java() 부분에 전체 패키지경로를 적으면 이용할 수 있으나, 패키지경로를 하드코딩해 넣으면, 추후 경로가 변경되었을 때 에러가 나기 때문에 기왕이면 imports 부분에 적는 것이 좋다.
// imports 로 추가해준다.
@Component
@Mapper(componentModel = "spring", imports = {OrderStatus.class})
public interface OrderMapper {
	...
}
빈으로 주입할 때 @Component 는 불필요하다
매퍼를 빈으로 등록해서 사용하는 경우나 매퍼 내부에서 다른 빈을 주입받아 사용이 필요한 경우@Mapper(componentModel = "spring") 를 이용하면 MapStruct가 Spring의 빈으로 Mapper를 등록한다. 즉, 컴포넌트 스캔에 의해 자동으로 빈으로 등록되며 의존성 주입을 사용할 수 있다. 따라서 @Component 는 불필요하다.
// Before
@Component
@Mapper(componentModel = "spring")
public interface MemberMapper {

// After
@Mapper(componentModel = "spring")
public interface MemberMapper {
}
자동 변환을 적극 활용한다
아래 예시는 Service 레이어에서 사용자 프로필을 반환할 때 사용자가 위치한 팀 정보를 같이 반환하라는 요구사항에 의해 작성된 것이다. 반복문을 돌리며 mapper 를 각각 호출해 매핑 후 다시 mapper 를 호출해 결과를 반환하는걸 확인할 수 있다.
// before
public ProfileResponse getMemberProfile(Long memberId) {
        Member member = memberRepository.findById(memberId)
                .orElseThrow(() -> new CustomException(MemberErrorCode.MEMBER_NOT_FOUND));
        List<ParticipantInfo> participantInfos = participantRepository.getMemberJoinTeam(memberId)
                .stream()
                .map(memberMapper::toParticipantInfo)
                .toList();
        return memberMapper.toProfileResponse(member, participantInfos);
}
변환할 대상(target) DTO 와 mapper 는 각각 아래와 같이 정의되어 있었다.
@Builder
public record ProfileResponse(
        @Schema(description = "멤버의 고유 키 값", example = "123")
        Long memberId,

        @Schema(description = "멤버의 닉네임", example = "yellow")
        String nickname,

        @Schema(description = "프로필 이미지의 URL", example = "http://example.com/image.jpg")
        String profileImage,

        @Schema(description = "멤버의 이메일 주소", example = "example@example.com")
        String email,

        @Schema(description = "팀 이름 & 해당 팀에서 역할", example = "team1, 관리자")
        List<ParticipantInfo> teams
) {

    @Builder
    public record ParticipantInfo(
            @Schema(description = "팀 이름", example = "team1")
            String teamName,
            @Schema(description = "팀 ID", example = "1")
            Long teamId,
            @Schema(description = "팀에서 역할", example = "관리자")
            String role
    ) {
    }
}

@Mapper(componentModel = "spring")
public interface MemberMapper {
    @Mapping(source = "member.id", target = "memberId")
    @Mapping(source = "participantInfos", target = "teams")
    ProfileResponse toProfileResponseDTO(Member member, List<ParticipantInfo> participantInfos);

    TermAllowanceResponse toAllowanceResponseDTO(Boolean allowance);

    default ParticipantInfo toParticipantInfo(QueryMemberJoinTeam queryMemberJoinTeam) {
        return ParticipantInfo.builder()
                .teamName(queryMemberJoinTeam.teamName())
                .teamId(queryMemberJoinTeam.teamId())
                .role(queryMemberJoinTeam.role()
                        .getDescription())
                .build();
    }
}
이 경우 participantInfos 에서 teamName, teamId, role 을 매핑해야 한다. default 메소드를 정의하고 서비스레이어에서 이를 사용해 반복문을 돌리기보다 MapStruct의 자동변환을 이용하면 훨씬 간결하게 만들 수 있다.
Mapper를 아래처럼 변경했다. teams 를 매핑하기 위해 toParticipantInfoList 를 정의하고 리스트 내부 QueryMemberJoinTeam 을 ParticipantInfo 로 매핑할 toParticipantInfo 를 정의했다.
@Mapper(componentModel = "spring")
public interface MemberMapper {
    @Mapping(source = "member.id", target = "memberId")
    @Mapping(source = "memberJoinTeams", target = "teams")
    ProfileResponse toProfileResponse(Member member, List<QueryMemberJoinTeam> memberJoinTeams);

    @Mapping(source = "role.description", target = "role")
    ParticipantInfo toParticipantInfo(QueryMemberJoinTeam memberJoinTeam);

    List<ParticipantInfo> toParticipantInfoList(List<QueryMemberJoinTeam> memberJoinTeams);

    TermAllowanceResponse toAllowanceResponse(Boolean allowance);
}
파라미터로 받은 필드의 내부적인 변환이 필요한 경우 위에서처럼 별도 메소드만 정의해주면 mapstruct 가 이를 이용해 알아서 매핑 로직을 만들어 준다. 서비스레이어에서 반복문을 돌려서 매핑할 필요가 없다.
public ProfileResponse getMemberProfile(Long memberId) {
Member member = memberRepository.findById(memberId)
.orElseThrow(() -> new CustomException(MemberErrorCode.MEMBER_NOT_FOUND));
List<QueryMemberJoinTeam> memberJoinTeams = participantRepository.getMemberJoinTeam(memberId);
return memberMapper.toProfileResponse(member, memberJoinTeams);
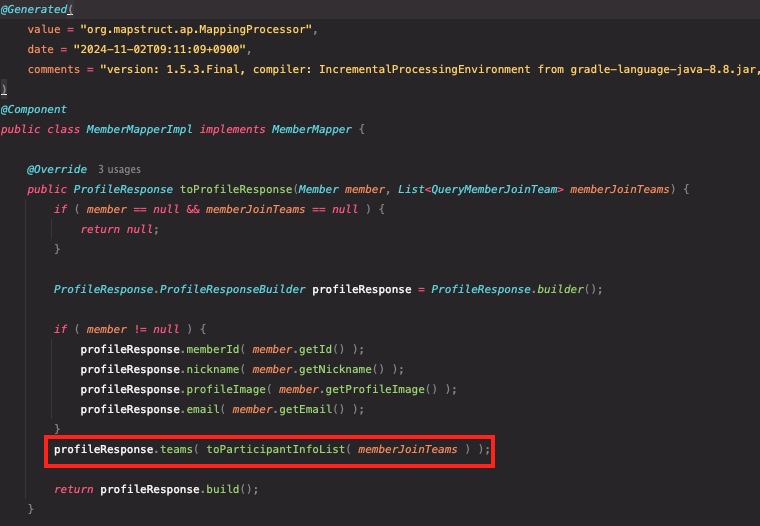
}실제로 그런지 확인해보자. MapStruct 를 사용하게 되면, 정의한 Interface 에 대한 Impl 이 생성되므로 여기서 확인해볼 수 있다.
profileResponse.teams 를 설정하는 과정에서 toParticipantInfoList 를 이용한다.
toParticipantInfoList 에서 개별 요소를 변환할때 toParticipantInfo가 이용된다.
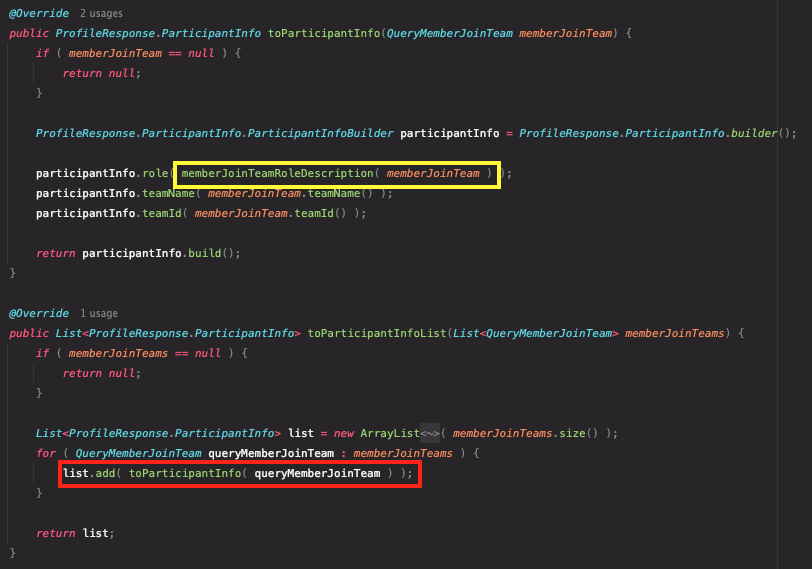
노란 부분에서 role 을 변환할때 `@Mapping`에 정의대로 작성된 것도 확인할 수 있다.

불필요한 @Mapping 을 사용하지 않는다
MpaStruct 를 도입하는 이유는 객체 매핑의 편리함 때문인데, 모든 필드에 명시적으로 @Mapping을 사용한다면 MapStruct를 사용하는 의미가 없다.
MapStruct는 매핑하는 target 객체의 필드 이름이 source 객체의 필드 이름과 동일하면 자동으로 매핑해준다.
파라미터가 여러개인 경우(=source 가 여러개로 들어온 경우)에도 마찬가지로 필드 이름이 동일하면 자동으로 매핑된다.
// before
@Mapping(target = "inform", source = "inform")
@Mapping(target = "member", source = "member")
InformMention toInformMention(Inform inform, Member member);

@Mapping(target = "title", source = "inform.title")
@Mapping(target = "memo", source = "inform.content")
@Mapping(target = "view", source = "inform.view")
@Mapping(target = "date", source = "inform.date")
@Mapping(target = "author", source = "inform.member.nickname")
GetInformResponse toGetInformResponse(Inform inform, List<InformComment> comments, List<Member> mentions);

// after
InformMention toInformMention(Inform inform, Member member);

@Mapping(source = "inform.content", target = "memo")
@Mapping(source = "inform.member.nickname", target = "author")
GetInformResponse toGetInformResponse(Inform inform, List<InformComment> comments, List<Member> mentions);
따라서 명시적으로 매핑을 사용해야 하는 경우는 아래 2가지로 정리해볼 수 있다.
- source 와 target 의 매핑해야 할 필드이름이 다른 경우
- source 가 여러개인데 source 끼리 동일한 필드가 존재하고 이를 매핑해야 하는 경우
두 번째 경우 MapStruct는 기본적으로 필드 이름이 같은 경우 매핑을 수행하는데, 어떤 source 의 필드를 사용할지 명확하지 않다.
예시로 들자면 아래와 같을 때다. 이때는 @Mapping 을 이용해 B 의 username 을 매핑함을 명확히 해야한다.
// source: A, B
// target: C
public class A {
    private String username;
}

public class B {
    private String username;
}

public class C {
    private String username;
}

@Mapper(componentModel = "spring")
public interface UserMapper {
    // B의 username을 C의 username으로 매핑
    @Mapping(source = "b.username", target = "username")
    C toC(A a, B b);
}
필드가 아닌 전체 객체를 매핑할 경우 명시적 매핑을 고려한다.
예시를 들면 다음과 같다. source 인 inform, member 의 필드가 아닌 inform, member 전체를 매핑해야 하는 경우다.
@Mapping(source = "inform", target = "inform")
@Mapping(source = "member", target = "member")
InformMention toInformMention(Inform inform, Member member);
이 경우 명시적 매핑을 하지 않으면 warning 이 발생한다.
InformMention toInformMention(Inform inform, Member member);./gradlew clean 후 실행시키면 테스트는 통과하지만 Unmapped target property 경고가 발생한다. 전체 객체가 아닌 특정 필드를 매핑하는 경우 이름이 같을 때 @Mapping이 불필요하지만, 전체 객체를 매핑할 때는 매핑 규칙을 설정하지 않으면 경고가 발생한다.
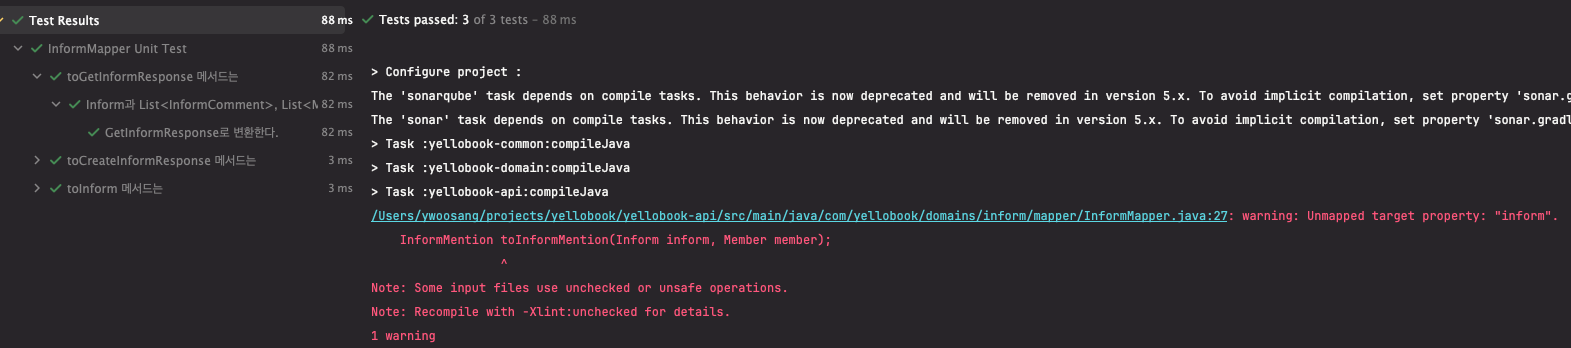
두 번째 실행부터는 경고가 사라지는데, MapStruct 가 컴퍼일 시점에 구현 클래스를 생성하기 때문이다. 처음 구현 클래스를 생성할 때 매핑 규칙이 명확하지 않다면 경고를 발생시키고 다음 실행부터는 구현 클래스를(Impl) 바탕으로 올바르게 매핑되므로 경고가 발생하지 않는 것이다.
경로를 간결하게 지정한다
파라미터 이름을 명시적으로 지정할 수 있지만 아래처럼 단일 매핑의 경우 값을 가져올 객체가 명확하므로 파라미터이름을 생략하면 더 간결하게 만들 수 있다.
// before
@Mapping(source = "informComment.member.id", target = "memberId")
CommentItem toCommentItem(InformComment informComment);

// after
@Mapping(source = "member.id", target = "memberId")
CommentItem toCommentItem(InformComment informComment);
하나의 Iterable 만 포함하는 객체에 Iterable 을 매핑할때는 default 메소드를 이용한다
Baeldung-Map Iterable to Object Containing Iterable With Mapstruct 에서 다루고 있는 내용이다.
아래와 같은 케이스다. target 이 단일 필드로 Iterable 을 가지고 있다.
@Builder
@Schema(description = "월별 키워드에 해당하는 일정 목록 응답")
public record SearchMonthlyScheduleResponse(
        @Schema(description = "일정 목록")
        List<QuerySchedule> schedules
) {
}
그리고 이를 매핑하는 mapper 메소드가 있을 때
@Mapping(source="schedules", target="schedules")
SearchMonthlyScheduleResponse toSearchMonthlyScheduleResponse(List<QuerySchedule> schedules);
직관적으로 매핑이 정상적으로 이루어질 것이라 생각하지만, 아래 에러가 발생하면서 매핑이 이루어지지 않는다.

이 경우 DTO 스펙을 변경시키지 않고 매핑이 정상적으로 이루어지게 하려면 default 메서드로 정의해야 한다.
default SearchMonthlyScheduleResponse toSearchMonthlyScheduleResponse(List<QuerySchedule> schedules) {
    return new SearchMonthlyScheduleResponse(schedules);
}
테스트코드를 반드시 작성한다
MapStruct는 코드를 자동으로 생성해 주기에 오류가 있는지, 매핑이 원하는대로 동작하는지, 실제로 실행하기 전까지 확인이 어렵다. 따라서 매핑을 위한 테스트 코드를 작성하여 놓치는 부분이 없는지 확인한다.
테스트 코드를 작성할 때 경우 Baeldung 튜토리얼을 참고했다.
편의성을 위해 Mapper를 빈으로 등록해 사용하고 있기 때문에 INSTANCE 변수를 사용하지 않아 아래처럼 getMapper 를 이용했다.
// 예시의 경우
TrafficSignalMapper INSTANCE = Mappers.getMapper(TrafficSignalMapper.class); // Mapper 클래스에서
TrafficSignalMapper.INSTANCE.trafficSignalToString(source); // 호출할 때

// 변경
private final MemberMapper mapper = Mappers.getMapper(MemberMapper.class);
팀 컨벤션에 맞게 @Nested 를 사용한 DCI 패턴으로 바꿔 아래와 같은 방식으로 작성할 수 있었다.
@Nested
@DisplayName("toParticipantInfo 메서드는")
class Describe_toParticipantInfo {
    @Nested
    @DisplayName("QueryMemberJoinTeam 을 받아")
    class Context_with_queryMemberJoinTeam_is_mapped {
        QueryMemberJoinTeam source;

        @BeforeEach
        void setUpContext() {
            source = QueryMemberJoinTeam.builder()
                    .teamId(1L)
                    .teamName("팀1")
                    .role(TeamMemberRole.ADMIN)
                    .build();
        }

        @Test
        @DisplayName("ParticipantInfo로 변환한다.")
        void it_returns_participantInfo() {
            ParticipantInfo target = mapper.toParticipantInfo(source);
            assertThat(target).isNotNull();
            assertThat(target.teamId()).isEqualTo(source.teamId());
            assertThat(target.teamName()).isEqualTo(source.teamName());
            assertThat(target.role()).isEqualTo(source.role()
                    .getDescription());
        }
    }
}
느낀 점
비즈니스 로직에 객체를 변환하는 작업이 섞여 코드가 복잡해지는 것이 싫어 별도 mapper 를 도입했다.
순수 자바 코드로 mapper 클래스를 만드는 방식과 MapStruct 를 사용하는 방식, ModelMapper 를 사용하는 방식을 비교해보았을 때, 처리 속도가 빠르고 자동으로 변환해주는 MapStruct 를 사용하기로 결정했다. (자세한 내용은 Spring : MapStruct의 사용법 및 ModelMapper와의 비교에서 잘 설명하고 있다.)
MapStruct 는 객체 매핑을 편리하게 도와주는 여러가지 기능을 제공하지만, 잘 모르고 사용했기에 장점을 제대로 이용할 수 없었고 오히려 코드가 지저분졌다. 코드 작성에 편리함을 주는 기술을 이용할 때 단순히 사용하는 것에 의미를 두지 말고 기존과 비교해서 나아진 점은 무엇이며 더 나은 사용 방법은 없는지 의심해보자.
'Spring' 카테고리의 다른 글
| [Spring] TestContainers, @TestConfiguration 사용시 @DynamicPropertySource 가 적용되지 않는 문제와 해결방안 (0) | 2025.04.10 |
|---|---|
| [Spring] API 응답에서 직접 정의한 Error code 는 왜 사용할까? (0) | 2025.03.16 |
| [Spring] OpenApI 3.0 Swagger 문서 작성 및 설정 방법 (1) | 2025.02.11 |
| [SpringBoot] @DataJpaTest 테스트 클래스 간 데이터 충돌 문제 해결 (0) | 2024.10.30 |
| [SpringBoot] 데이터베이스 마이그레이션 툴 Flyway 도입기 (0) | 2024.09.28 |